My projects
What is missing from your backyard
Medicinal Garden Kit


Nichole Apelian, Ph.D., created the Medicinal Garden Kit to help you take charge of your health in a fun way! Imagine having a little medicinal garden in your backyard, so you can easily pick fresh remedies whenever you need them—even during tough times when pharmacies are closed.
With this kit, you'll receive seeds for 10 amazing herbs, chosen for their quality and efficacy. Plus, you’ll get a free copy of the "Herbal Medicinal Guide: From Seeds to Remedies," which provides simple instructions for making tinctures, ointments, and more, even if you’re new to herbal medicine.
Here are the 10 plants you’ll grow:
1. Chicory – Your Painkilling Plant
2. Yarrow – The Wound Healer
3. California Poppy – A Natural Sleep Aid
4. Marshmallow – Digestive Superstar
5. Chamomile – Natural Antibiotic
6. Evening Primrose – Skin and Nerve Relief
7. Lavender – Anti-Inflammatory Delight
8. Echinacea – Immunity Booster
9. Calendula – Essential During Tough Times
10. Feverfew – Nature’s Answer to Migraines
The kit includes 4,818 high-quality, non-GMO seeds, and the guide will help you plant, grow, and harvest with ease. Enjoy your gardening journey! buy it now!
https://taylor-lynn.com/boho-crochet-top-pattern/
Lion Brand Yarn mercerized cotton 24-7 Cotton Yarn, Ecru (cream color used for trim)
Lion Brand Yarn mercerized cotton 24-7 Cotton Yarn, Jade (substitute for the green ICE yarn I used).
Crochet Hook: I used a 3.25mm Clover Brand Hook. If you use a lighter weighted yarn you’ll want to use the hook size suggested for that yarn.
This boho crochet top is made in a size medium. the other sizes will be written as follow M (S,L) for example Ch 4 (2,6). For a medium it would be ch4, ch2 for a small, and ch6 for a large.
CH 13 (12,16)
Round 1: HDC in the third CH from hook. HDC 1 in each Ch. In the last chain you will want to do two HDC in the same stitch. Ch1 and again do 2 more HDC’s in the same ST. Now on the back side of the CH you will do 1 SC in each ST down the row. Refer to chart below for further clarity. **** NOTE: NUMBER OF CHAINS IN GRAPHIC DIFFER FROM PATTERN. JUST USED AS VISUAL EXAMPLE.
Round 2: CH 2 (does not count as first HDC) and turn. HDC in each HDC from the previous round until you get to the CH1 space in previous round. In that CH1 space, HDC, CH1, HDC and then do 1 HDC in each of the next HDC from previous row.
Round 3-11 (11,13): Continue round 2 until you reach your desired width and height for your cup keeping in mind that for the border you will be adding one more additional row of SC’s around the entire cup. For this step just hold the cup against yourself and stop adding rows when you feel there is sufficient coverage. The number of rounds listed are just a rough suggestion for sizing.
Bottom of cup: CH1 at the end of your last round and turn so you are working across the bottom of the cup. SC as evenly as possible along the bottom of the cup. HINT: SC one for each row of SC’s
Repeat: Tie off and repeat exactly for the second cup making sure that you end up with the same number of SC along the bottom of both cups (I ended up with 36 SC on each cup).
Piecing It Together
Connecting the cups - lay the cups on top on each other, right sides together. Starting at the bottom corner connect the two tops together with a SC by sticking the hook through the bottom corner stitch of both cups, pulling up a loop, YO and pull through all loops on hook. and continue up the side of the cup for 6 SC’s to connect the cups. Tie off.
Tie onto the outer corner of one cup. Now make a row of SC along the bottom of your cup, cut yarn and tie off.
Making the back strap - I used a chainless HDC foundation chain (Option 1) for this step (check out this super quick YouTube tutorial to learn how, beginners don’t be afraid to try this! It is just another crochet stitch to add to your arsenal), but if you work up a chain and SC back down (Option 2), it will have the same effect. I just think the chainless foundation is a neater option and a bit quicker for me.
I changed yarn color to cream at this point for the trim.
Option 1:
Make 85 Chainless HDC foundation stitches and connect to corner of one cup.
HDC in each stitch across and once you reach the other end of the boho crochet top, again make 85 chainless HDC foundation stitches. Tie off and weave in ends.
Option 2:
Tie onto corner of top. CH 85 and SC back down in each chain.
HDC across the bottom of the boho crochet top. When you reach the opposite corner again CH 85 and SC back down the chain. SS and tie off when you reach the first CH.
Adding Lace Detail to Boho Crochet Top
You will want to use a stitch marker on the middle of the top. Count over 3 from the middle on both sides and mark those stitches. Now you can count out by seven’s until you are one unit of seven past the corner of the cup and mark that stitch. Do the same number of 7 units on the other side and mark it. This is where your lace bottom will start and stop. Feel free to increase or decrease the length that the lace will go around your top by adding or subtracting 7 stitches for each increase or decrease of length.
Lace Row 1: Tie on where you put your outside marker and make a SC. CH 6, Skip 6 St(s) and SC in the 7th. repeat this until you reach the middle of your top. Still make 6 chains but only skip as many stitches as you need to make sure the middle lace is centered. Then repeat the steps between the * * until your stitch marker on the other end. CH1 and turn.
Lace Row 2: SS into the CH6sp (chain 6 space) from the row before. CH 3. Do 3 DC in the CH6sp, CH 2, and Do 4DC in the same CH6sp. Now in the next CH6sp do 4DC, CH2, 4DC. Continue that in every CH6sp across the row. CH 3 and tur.
Lace Row 3: You are essentially making three loops of chains in the top peak of the ch2sp(s) from the previous row. SC in the ch2sp from the previous row. CH 12 and SC in the ch2sp again, CH 14 and SC back into the same ch2sp, then again CH 12 and SC in the same ch2sp. CH 3and SC in between the two clusters of DC in the previous row (see picture below). CH 3 again and SC in the next ch2sp from the previous row, CH 12 and SC back to CH2sp, CH 14 and SC back to Ch2sp, CH 12 and SC back to CH2sp, CH 3and SC in between the two clusters of DC in the previous row repeat between the * * across the row. When you reach the end of the row CH 6 and turn.
Lace Row 4: Complete 3 SC in the CH12sp you made in the previous row. In the CH14sp do 4DC, CH2, 4DC. In the next CH12sp again do 3SC. repeat that starting with 3sc in the next CH12sp in the row and continue until you reach the end of the row. The picture below is what your trim should look like after completing this step.
Trim and Neck straps You will tie onto the corner of the cup where the picture below points to. You will do a series of sc’s and picots. As cup sizes will vary, so will the number of picots. You could do every other as a picot, or do 3-4 SC’s between picots. I will describe what I did.
Once you’ve tied on, SC in the next 4 stitches along the side of the cup, then make a picot(p). SC in the next 4 stitches, make a picot(p). Repeat between the * until you reach the top of the cup.It may not be exactly four stitches for a picot left depending on the number of chains you started with and the amount of rounds you made. That is fine, we will just match it to the other side when we get there.
Neck Strap: Once you reach the top of the cup CH80. Then SS all the way down the CH until you reach the first CH again.
Inside Cup Border: SS to the top stitch. Now you will want to see how many SC stitches you did on the outer side until you reach your top picot and do the same amount so the picots are at the same heights on either side of the cup.
For example if from the top of your cup you only have 3 SC then your Picot, on this side you will SC 3, p, then continue with the SC 4, p, SC 4, p until you reach the middle of the cups
When you reach the middle of the cups you can either just SC in the top stitch connecting the two cups, or you could center a picot there like I did. Again you will want to make sure the picots match with the other cup so match your bottom picot up and follow the sc4, p repeatedly. Repeat the directions for the inside cup and outside cup border and making your strap at the top of the second cup.
Tassel Here, Tassel There… Every good boho crochet top needs tassels! I did my tassels at the peak of every lace unit meaning I had 13 tassels. You could add more tassels in between the peaks as well if you wanted.
I cut 39 stands of the trim colored yarn about 18 inches, and 13 strands of the green yarn the same length. I used three strands of the trim color and one green for each tassel. Fold strand in half and pull partially through the peak where you are tying it on. Then pull the tail ends through itself. Check out the picture below for clarification. You can use your crochet hook or fingers and insert the group of strands into the loops you made on the bottom of the cups and pull them through themselves as pictured.
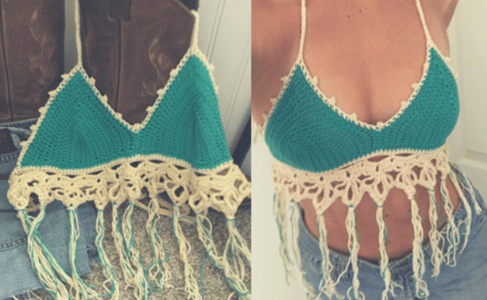
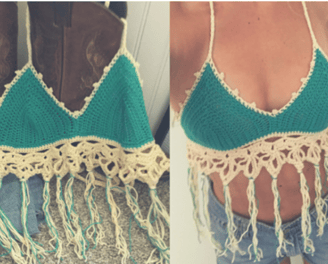
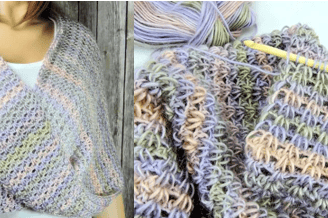
Boho Crochet Top
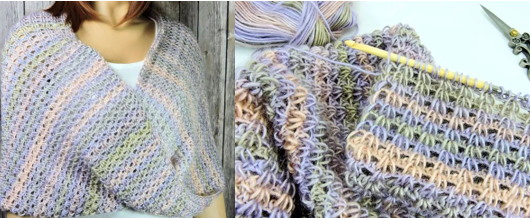
Eternal Spring Infinity Scarf Free Tunisian Crochet Pattern
https://crochetkim.com/eternal-spring-infinity-scarf/
Technique: Tunisian Crochet Finished size 15″ x 43″
Materials
o Red Heart “Unforgettable” (100% acrylic, worsted size 4 weight, 280 yds per 3.5 oz skein): 2 skeins or approx 560 yds (shown in springtime)
o Suggested Tunisian (afghan) hook size: J-10 [6m]
o Needle (for weaving ends)
Gauge In stitch pattern, 17 sts for 10 rows measures 4″.
Stitch Multiple Chain any multiple of 3 then add
Instructions
Row 1A: Ch 65, sk first ch, insert hook in next ch, yo, pull lp through, leave lp on hook, rep from across: 65 lps on hook.
Row 1B: [Ch 2, yo, pull through 4 lps on hook] across until 1 st remaining (2 lps are on hook), ch 1, yo pull through 2 lps on hook: 21 3-st clusters formed.
Row 2A: Sk first st, [pull up lp in closing chain before 3-st cluster, on top of 3-st cluster and closing chain just after 3-st cluster] across, pull up lp in lower ch of beg ch 2 of closing chain: 65 lps on hook.
Row 2B: [Ch 2, yo, pull through 4 lps on hook] across until 1 st remaining (2 lps are on hook), ch 1, yo, pull through 2 lps on hook: 21 3-st clusters.
Rows 3-104: Rep row 2. (Unlike other Tunisian crochet stitch patterns, no bind off row is necessary.) Fasten off.
Finishing With yarn needle, seam bottom of first row to top of last row. For a Mobius twist, hold the first row next to the last row, rotate one side by flipping it over 180 degrees and seam. Weave in all ends securely.
Inspiration
Explore creativity, health, and family heritage today!
Connect
Thrive
Cjsbooksbitsndbobs@gmail.com
Idaho
© 2024. All rights reserved.